Debian Etch GNU/Linux on a Dell Latitude D420
Since September 2010, this laptop runs Ubuntu 10.04 Lucid Lynx. After three and a half years and uncountable Debian testing upgrades, my system became rather slow and broken (suspend became unreliable, etc.). Time to start afresh! Reinstallation went like a breeze, without any of the issues that I encountered in 2006 and which originally motivated this document.
Warning : outdated document
(2008/01/10) I have not updated this document since almost a year, and as such it is now quite obsolete. When I got the machine, Etch was still the testing release of Debian, now it has become stable but I went on with Lenny... Someone installing Debian on the D420 today will probably get a quite different experience (maybe not so if she sticks to Etch, who knows). There has been so many updates that I can't make a comprehensive list, below I just sketch a partial one. It is probably not worthwhile to spend time modifying the rest of the document, which I leave as a historical note. You have been warned.
So let me just say briefly what the main changes have been:
- video is now handled by the intel Xorg driver (instead of i810), so 915resolution is no longer required, and dual-screen is done using the RandR extension (which means that one no more has to tweak xorg.conf, but can reconfigure displays dynamically using a tool like xrandr)
- I removed powersaved as now power management is done through hal and the pm-utils scripts (kpowersave now acing as a front-end to these)
- wireless is a bit capricious these days (sometimes I have to make several attempts before being able to connect), and somehow things will change again when I switch from the ipw3945 driver to the newer iwl3945.
- for the rest, a number of bugs I mentionned have been fixed, while new ones appeared...
And now, you can read...
The older story
This document is an account of my pleasant experience running GNU/Linux on a Dell Latitude D420. Installation reports from others had been very useful to me, so I guess it was appropriate for me to spend time writing one (and that's also a memo for me). I shall probably add the usual disclaimer that the information is provided here "as is" and I take no responsability for what you do with it. Anyway I'd be happy to receive any form of feedback, for which you can use the email link in the top right corner.
History of this document :
- first version : 29 November 2006
- second version : 15 December 2006 (minors updates about sound, network, suspend, CD burning)
- third version : 7 February 2007 (rewrote the suspend section, minor updates elsewhere)
- fourth version : 14 February 2007 (main changes in suspend, network, hotkeys)
- fifth version : 2 April 2007 (main changes about dual display, KVM virtualization, APT)
About the hardware
The Dell D420 is a lightweight notebook featuring a 12" widescreen (16:10) display. It has roughly the size of a A4 sheet for a width of 2.5 cm and a weight of only 1.5 kg. For that, the CD/DVD drive is not internal but comes in a "MediaBase" (with extra ports) on which the laptop can be fastened. Together they form a slightly thicker and heavier (2 kg) assembly, that is however still convenient to carry when needed.
As for the components, my laptop has the following :
- Processor : Intel Core Duo U2500 at 1.2 GHz
- Chipset : Intel 945 GMS
- Memory : 1 GB (2 x 512 MB DDR2 SDRAM)
- Display : 12.1" WXGA (1280x800)
- Video card : Intel GMA 950 (integrated with shared memory)
- Hard drive : 60 GB (IDE 4200 rpm)
- 8x DVD writer in the MediaBase
- Other integrated components : audio, Ethernet (Broadcom BCM5752), WiFi (Intel 3945 ABG), Bluetooth, USB, Firewire, SmartCard reader, 56K modem, PCMCIA Type I/II slot
Installing Debian Etch
I received the machine on 16 November 2006. It was pretty clear that the pre-installed Windows XP was not going to stay (so much unwanted stuff on it, if I ever need Windows again I'll use a non-OEM version provided by my institution). I did a few tests with Ubuntu Live CDs, but I decided to remain committed to my favorite distribution : Debian testing (codenamed Etch as of 18 November 2006).
Having both a CD drive and a decent Internet connection at hand, the simplest choice was to do a network install from a minimal CD (principle explained here). As I wanted Debian testing, I picked the i386 netinst CD image from here (as of 18 November 2006 this is the Etch RC1 version), burned it on a CD/RW, and booted on it (laptop being plugged in MediaBase with AC and Ethernet). The installation process went rather straightforward, using the graphical version obtained by typing "installgui" at the boot prompt (I could even use both the internal touchpad and my external USB mouse !). The process took roughly 30 minutes (I might provide a precise description of it later...), after which the CD was ejected and I could reboot on my brand new Debian GNU/Linux operating system. Additional settings could then be made from there, within already a very usable system. Globally I've been very impressed by the progress made by GNU/Linux since I started using it. But there are still a few occasional issues... Let me now try to provide some useful hints, which fall in the following categories :
Hardware-related
Display (outdated, see above)
Screen and video card were detected correctly during installation, hence X.Org works out of the box (that is, the first boot greeted me with a graphical login screen). The only issue is that the resolution was 1024x768, which is not the native screen resolution. Quick fix : install the 915resolution package (which does the suitable video BIOS hack) and restart X.
The Intel GMA 950 video card is probably not the fastest on the market, but it has the decisive advantage of having fully free open-source drivers (thanks to Intel itself) hence 3D acceleration works out of the box ! Quick check : install the mesa-utils package and try glxinfo (look for a line "direct rendering: Yes") and glxgears (which is not a benchmark). Longer check : install the tremulous package... Video acceleration (XV) works fine too.
Those fancy 3D window managers (Xgl, AIGLX, Compiz, Beryl...) should work without trouble, thanks to the good 3D support mentionned above. For a quick and risk-free test, grab a recent (5.1) Knoppix, which includes Beryl. I'm waiting for it to stabilize a bit and be included in official Debian before considering using it on a daily basis.
Dual display (subsection added 2007/04/02 -- now outdated, see above)
Due (partly) to popular demand, I have finally tried an external display. I see two main situations where this can be useful :
- you have to make a presentation using a video projector
- you want to save your eyes by using a larger screen.
For the first point at least, one could dream of the simple solution : (i) plug the video cable in (ii) press the "hotkey" Fn+F8. But your external display won't likely accept 1280x800 so first you have to switch to a more compatible resolution (I do that by restarting X in a different configuration). With that, you can indeed get the external display on/off by pressing Fn+F8 but don't do that too much because it can crash the machine, see this Ubuntu bug report describing the same behaviour I experience.
A more advanced and satisfying solution is dual display i.e. we use both the internal and the external screens to create a larger desktop (and you can move the mouse from one screen to the other, drag windows, etc). In a presentation you could have your slides on the beamer and notes on the laptop screen... In order to do that, you need to enable the Xinerama extension, and that typically requires tweaking the X server configuration (/etc/X11/xorg.conf). In my case it was rather easy because a reader of this page kindly sent me his own configuration file, which I just had to adapt (thanks to Olivier Carton). You can download the result here, see comments within. For instance to activate the dual screen configuration, log in from the Linux console (with no X server running, e.g. look for the "Console login" option at the KDM login screen) and run "startx -- -layout dual". Is there any easier to do that from within KDM ? Not also that 3D acceleration seems disabled with dual screens, I don't know if that can be fixed.
Sound
The audio card is detected correctly during installation, hence sound works out of the box (using ALSA's snd-hda-intel module). There is however an occasional issue with sound initialization during boot : sometimes I see a message , the system waits for a while, then proceeds, and sound is not working (I can however manually reload the module later and it goes). I have not really investigated yet but this might be due to some kernel bug... Update (2006/12/15 then 2007/04/02) : this problem does not seem to appear anymore less often, with a 2.6.18 kernel (Debian package linux-image-2.6-686-4). Since I tend to boot less often, thanks to suspend, it's not too much an issue for me but I'd like to see a fix...
Besides that the laptop contains only a 1W mono speaker, so do not expect hifi sound, unless you use good external speakers. Volume can be set by your favorite application, the keyboard also features hot keys, see below how to activate them.
Network
Ethernet
The Ethernet controller is detected correctly during installation (of course since we did network install...) and, provided there is a DHCP server on the LAN, wired network works without any manual configuration (it is seen as eth0 and uses the tg3 kernel module). I realized that the interface is not activated using the traditional ifupdown scripts, but the fancy new NetworkManager (this might be due to me choosing the "laptop" software selection during installation). It even detects whether there is a live Ethernet cable plugged or not ! (before I knew ifplugd for this task.) As I use KDE, I found the network-manager-kde package useful, it contains a knetworkmanager applet which communicates with the NM daemon in order to adjust various network settings. Note that NM is deliberately limited in its features, e.g. it does not support static IP settings. But it makes switching between networks very easy, and I strongly recommend installing/using it (except if you have a non-standard network like one without DHCP). It is still possible to have a script being run when an interface goes up/down, put it in /etc/network/if-up.d/ or variants (for instance I use one to automatically adjust the outgoing SMTP server).
Wireless
The WiFi interface (Intel 3945 ABG) requires a little setup. Indeed there is an official Linux ipw3945 driver (thanks Intel again) but it relies on some proprietary code (currently binary firmware and "regulatory" daemon, fortunately the kernel module is open-source) hence it cannot work out of the box on a freedom-aware distribution like Debian. However WiFi is a nice feature and it is possible to have it work with limited pain and twist to moral principles. First you need to install the following (non-free) packages : firmware-ipw3945 (firmware) and ipw3945d (daemon). Next you have to install the kernel module, which can be done in two (Debian-specific) ways :
- if you run a Debian kernel (which is the default), then you can find a precompiled module in the ipw3945-modules-XXX package, where XXX is the Debian kernel version (given by "uname -r").
- otherwise you need to compile the module, which can be done by installing the ipw3945-source (depending on module-assistant), then run "m-a a-i ipw3945".
After that you can immediately load the module with "modprobe ipw3945", or reboot (from now on, the module should be automatically loaded at boot -- of course if you change the kernel you need to reinstall/recompile a new module). With that the WiFi interface appears as eth2 (eth1 seems to be for Ethernet-over-Firewire with the eth1394 module, untested yet...) and iwconfig sees the wireless extensions.
After this initial installation, connecting to a wireless network is a breeze with NetworkManager (see above). The KDE applet allows to easily see the detected wireless networks, associate to one (by authenticating if necessary), and reconnect automatically to the already known networks (keys are stored by kwalletmanager). All standard encryption schemes are supported, at home I use WPA-PSK (WPA2-AES-CCMP) which is expected to be very secure (provided that the passphrase is not so silly).
One bug remains : there is a mechanical "radio kill" switch on the side of the laptop, which allows to turn on/off the wireless interfaces. When booting with radio off, the system hangs when "activating network connections". I had similar issues with Ubuntu Edgy Live CDs (probably this bug). Meanwhile, if I boot with the switch on, then turn radio off/on later, things go nicely (iwconfig can see the switch state, but NM does not seem to receive a notification). If you have a fix I'd be glad to know.
Suspend (outdated, see above)
Since February 2007, I have working suspend-to-disk *and* suspend-to-ram ! This is done with the powersave daemon (and a 2.6.18 kernel), coming in the powersaved Debian package, together with a KDE controlling applet in kpowersave. Among other things (see below), powersaved acts as a wrapper around the uswsusp scripts, and does the necessary black magic like unloading reluctant kernel modules. Just right-click on the kpowersave tray icon, and you can call s2disk and s2ram.
s2disk works like a charm, and makes a faster alternative to shutting down the computer ! Edit the line EVENT_BUTTON_SLEEP in /etc/powersave/events to choose whether the sleep hotkey (Fn+Esc) should call s2disk or s2ram. See also the hotkeys subsection for using the hibernate hotkey (Fn+F1).
s2ram needs a little more work, but not so much as the D420 has at last entered the whitelist (for Debian make sure the uswsusp package version is 0.6~cvs20070202-1 or later, which might require using the unstable distribution, see below). However, there seems to be a bug in the tg3 module for the Ethernet card, which causes the system to fail to resume after the second suspend (not the first !) when the interface is up. See the thread here, and thanks to Rafael Wysocki for helping pinpoint the problem. As advised, I opened a kernel bugzilla entry here, but meanwhile a fix is to unload the tg3 module before suspend. With powersave, this is done by editing /etc/powersave/sleep again and adding "tg3" to the UNLOAD_MODULES_BEFORE_SUSPEND2DISK and UNLOAD_MODULES_BEFORE_SUSPEND2RAM options.
Minor glitches remain :
- after resume you have to touch volume settings to restore sound
- USB peripherals connected during suspend do not work, one should resume first
- on some occasions, the WiFi interface has issues reconnecting to a network, desactiving/reactivating it with the knetworkmanager applet seems to help
- the hibernate hot key (Fn+F1) does not return an acpi event (see below).
Miscellaneous
There is less to say about the rest of the hardware, let me make a list :
- the Bluetooth interface is seen as a USB device (when the radio switch is on) and seems to be handled by the bluetooth kernel module. I installed kdebluetooth and kdebluetooth-irmcsync for KDE support, but I have not yet found a device to play with...
- the CPU is, as its name suggests, two cores, and indeed the kernel sees two processors according to "cat /proc/cpuinfo". I got frequency scaling working by installing powersaved and its KDE frontend kpowersave (the redundant klaptop applet can then be desactivated)
- input peripherals (keyboard, touchpad, external USB mouse with scrollwheel) were all correctly configured during the installation. It seems that one can have advanced settings for the touchpad (e.g. emulate a scrollwheel) but I have not tried yet. Update (2007/02/14) : I created a specific section for keyboard hotkeys below.
- the CD/DVD in the MediaBase is seen as a USB drive. It reads correctly (KDE is even aware when a disk is inserted), I did not try burning yet but I have little worry. Update (2006/12/15) : actually CD burning with K3b did not work out of the box, it seems to be due to Debian bug #354118. As suggested, I managed to burn a CD using wodim with "dev=/dev/scd0". For k3b, add this same string in "Settings > Configure K3b > Programs > User Parameters > cdrecord".
- all external ports of the MediaBase seem to work. It is possible to hot-plug and -unplug the laptop to/from the MediaBase (at some points this caused system freezes but now it works again, no idea why).
- I cannot see the internal modem using lspci/lsusb, makes me wonder if it is really included. Anyway I do not expect it to work nicely since it should be a Conexant winmodem only supported by a proprietary driver.... (I used once an external serial modem, it was easy with kppp)
Hotkeys
The keyboard has a number of "hotkeys" (activated by pressing the "Fn" key together with another one), making them work require a number of (from simple to really dirty) hacks. Tell me if you find a better way.
The easiest ones are the volume keys (Fn+PgUp/PgDn/End). To make them work in KDE, execute the following xmodmap commands :
	keycode 160 = XF86AudioMute
	keycode 174 = XF86AudioLowerVolume
	keycode 176 = XF86AudioRaiseVolume
This can be done at KDE startup by e.g. putting these lines in a ~/.Xmodmap file, then create a file ~/.kde/env/xmodmap.sh containing a line "/usr/bin/xmodmap $HOME/.Xmodmap". This has to be done for each user, I'm still looking for a cleaner, system-wide, way (I heard that one should rather use XKB nowadays but I do not know how, please tell me). Once the XF86AudioBlabla symbols are set, kmix does the rest.
Things are more tricky for other keys, since they do not return a "keycode". This can be fixed by running (as root) something like :
	setkeycodes e00a 122
	setkeycodes e007 123
	setkeycodes e011 178
(I suggest adding these lines to /etc/rc.local so that they are run at boot). e00a corresponds to the hibernate (Fn+F1) button, e007 to battery (Fn+F3) and e011 to "WiFi catcher" ("»" symbol on radio switch)... 122, 123, 178 are somewhat arbitrary keycodes and weirdly they are not the ones seen under X (which are respectively 210, 209, 143). Next you need to associate "symbols" to these "keycodes", which is done with xmodmap as above. For instance I added a line "keycode 210 = XF86Sleep" for hibernate button (symbols cannot be arbitrary, pick some unused symbol in /usr/share/X11/xkb/symbols/inet, e.g. XF86LightBulb). Finally you have to use a program that reacts on the X events, in KDE you can use khotkeys (in "Configuration > Regional and accessibility"...) : I created an action so that XF86Sleep calls "/usr/bin/powersave -U", so now pressing Fn+F1 indeed initiates suspend-to-disk.
Note that the sleep (Fn+Esc) button is not handled in the same way, it creates an acpi event forwarded to powersave (see suspend section).
Software-related
Additional packages
The first thing I noticed after the installation is that selecting the "graphical desktop" option brings the GNOME environment. I'm a KDE guy so this had to be fixed quickly... Logged in as root on the console, I did "aptitude install kde", which brought all official KDE modules, and I could even set KDM as the display manager. I could then start my first KDE session, and immediately felt at home on this new machine...
(As of April 2007 this paragraph is probably more a historical note.) However I quickly encountered a bug in the K Configuration Center (was empty), which had already been reported e.g. here, and fixed. But as of 20 November 2006 the fixed kdelibs package had not arrived in testing yet, so I should upgrade to the unstable version (this is rather non-intuitive for non-Debian users...). This led me to reconfigure APT in order to access simultaneously to the stable, testing and unstable repositories, see my APT configuration files in appendix. Then an "apt-get install kdelibs -t unstable" did the job.
Let me now list other packages that I had to install manually (I left the default selections of the installer) :
- Hardware-related (see above) : 915resolution, mesa-utils, network-manager-kde, ipw3945-source, ipw3945d, wpa_gui, kdebluetooth, kdebluetooth-irmcsync, powersaved, kpowersave
- A nice graphical mail reader : icedove, icedove-locale-fr (it is actually Thunderbird rebranded by Debian, following a recent flamewar)
- Other KDE stuff : yakuake, gtk-qt-engine, kaffeine, amarok (resp. a nice "Quake-like" console, a utility to make gtk applications look like native KDE, a media player for KDE, the best audio player around !)
- File synchronization : rsync, unison, unison-gtk
- Media players : vlc, mplayer (now in Debian official ! however libdvdcss2 is not -- you can also have a look to /usr/share/mplayer/scripts/binary_codecs.sh...)
- Miscellaneous : deborphan, units, slocate, ntp, openssh-server, ttf-bitstream-vera...
- Non-free stuff : unrar, flashplugin-nonfree, msttcorefonts
Misc. system settings
Here I list a few additional settings I did :
- A little network security : you can see what processes are listening on the network with "netstat -tulp" (as root). Pay attention to what is listening on non-loopback interfaces (lines with "*:something" in the fourth field). In my case I removed the unneeded lisa, nfs-common, portmap packages, and ran "update-rc.d -f openbsd-inetd remove", so that only the SSH server now has an open public TCP port. As for UDP, there are still a few open ports, related to autoconfiguration daemons (dhclient, avahi-daemon, cupsd, ntpd) so let's value comfort over paranoia. Anyway I shall only connect to trusted networks with firewalls...
- I had to adjust the size of fonts and icons according to the screen size. Now I am using small icons in the KDE taskbar, and set the default font size to 8 for menus, etc. (I use bigger fonts in consoles). The gtk-qt-engine package was useful in order to apply the same settings to Firefox and Thunderbird...
- Installing Mathematica : from my work I got a single-machine license, installation with the CD went straightforward, however I had issues with the graphical frontend. It seems to be due to Mathematica 5.0 not finding some X files (the truth is out there) since the X.Org 7 migration. Quick fix :
		ln -s /usr/share/X11/locale /usr/X11R6/lib/X11
		ln -s /usr/share/X11/XKeysymDB /usr/X11R6/lib/X11
Virtualization with KVM (section added 2007/04/02)
The Intel Core processor features the VT extensions providing hardware virtualization support. Recently all the buzz has been about KVM (Kernel-based Virtual Machine, see also its Wikipedia page) which is a fully free/open-source solution exploiting these extensions. KVM is a combination of the well-known QEMU emulator (which already allowed for virtualization albeit in a slower way), and a kernel module providing the hardware acceleration for x86 guest machines. The kernel module has been officially included in mainline Linux kernels from version 2.6.20 (which bodes well for future support of this technology), but it is also possible to compile it for the Debian Etch kernel (2.6.18). Simply follow these instructions (personally I prefer aptitude to apt-get, note also that VT extensions might be disabled by the BIOS so check its setting).
With that it was easy to install Microsoft Windows in a virtual machine, using XP Pro ISO image and licence provided by my institution. In some (less and less frequent) situations, having such an OS at hand can be useful, and a virtual machine is an interesting alternative to dual-boot. In my case I created a virtual disk image of only 4.3G (enough for my minimal needs) for easy backup on DVD. Installation went well using the above-mentionned instructions, note however that a Windows installation typically involves a number of BSOD and reboots, but since here everything happens in a virtual machine you simply need to close kvm and restart it (from the second reboot on, you should probably drop the "-boot d" option to boot on virtual hard disk, but keep "-cdrom [...]" as you still need the installation CD).
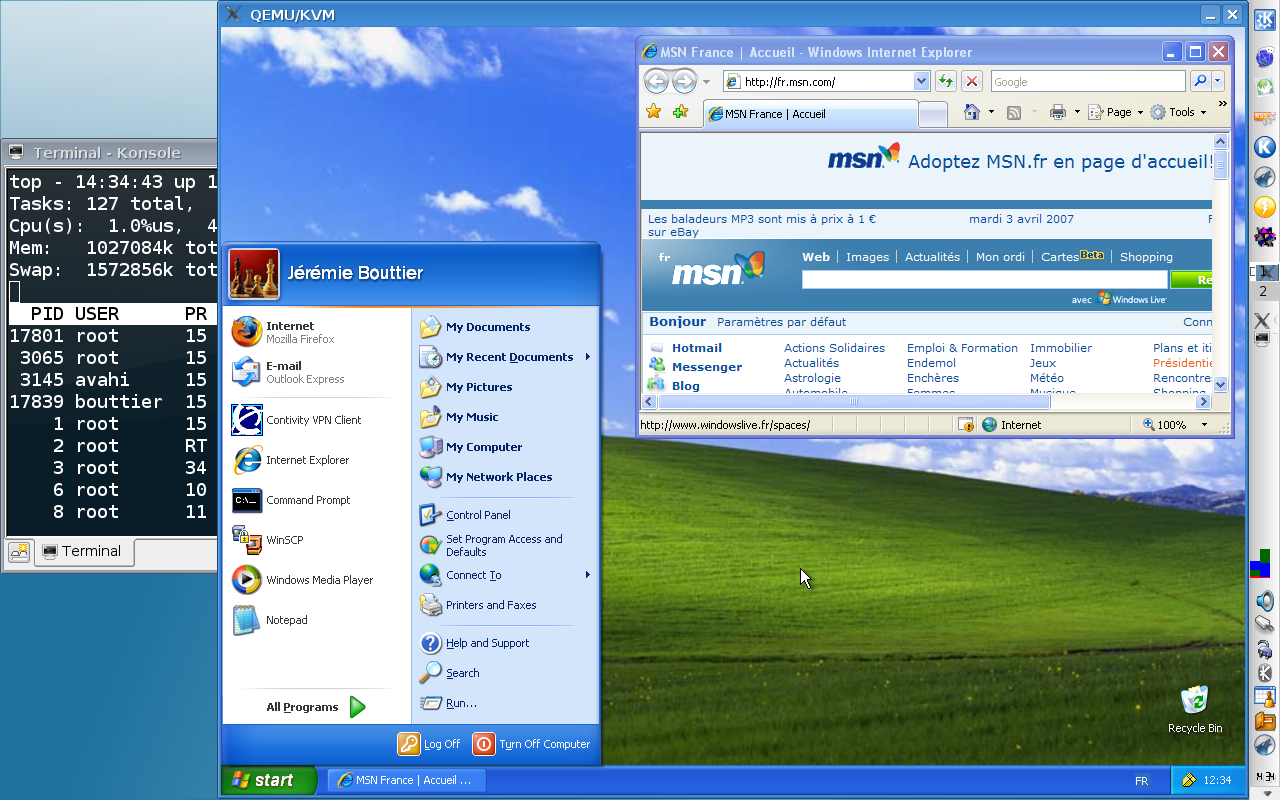
After installation you get a fully functional installation of Windows albeit in a virtual machine : be careful that viruses and other malware can be fully functional there too (but that does not affect your host Linux OS). Windows thinks it is running in a real PC with real peripherals (including graphic, network, sound cards being emulated by qemu/kvm). This works quite well in practice, making Windows very usable. I cannot tell whether it runs at near-native speed as advertised (anyway you're only using one CPU core and a fixed amount of RAM, -m 256 or 384 seem to provide decent performance while leaving room for other Linux processes) but it's considerably faster than without hardware acceleration. For the curious here is a screenshot.
Note that in no way you're restricted to running MS Windows : any x86 OS will enjoy running in kvm (except perhaps MacOS X) and with a virtual machine you can very easily boot a Live CD, install another Linux distribution, tweak the system without risk, etc. The only missing thing is 3D acceleration.
Additional note on KVM networking
By default kvm emulates network with a "user mode network stack" requiring no root priviledges : this is good enough for most uses. However in some cases this might be insufficient (e.g. I want to use a IPsec VPN client) : my current solution consists in invoking kvm with the "-net nic -net tap" options, after editing the (Debian-specific) file /etc/kvm/kvm-ifup setting up host-side networking :
#!/bin/sh

# returns the interface with default route
switch=$(ip route list | awk '/^default / { print $NF }')
# for virtual bridge => disabled
#ifconfig $1 0.0.0.0 up
#brctl addif ${switch} $1

# rather we assign a private IP address
/sbin/ifconfig $1 172.20.0.1

# routing
iptables -F
iptables -P FORWARD DROP
echo "1" > /proc/sys/net/ipv4/ip_forward
iptables -A FORWARD -i $switch -o $1 -m state --state ESTABLISHED,RELATED -j ACCEPT
iptables -A FORWARD -i $1 -o $switch -j ACCEPT

# masquerading
iptables -t nat -F
iptables -t nat -A POSTROUTING -o $switch -s 172.20.0.0/16 -j MASQUERADE

# DNS forwarding
ns=$(cat /etc/resolv.conf | awk '/^nameserver / { print $NF ; exit }')
iptables -t nat -A PREROUTING -i $1 -p tcp --dport domain -j DNAT --to-destination $ns
iptables -t nat -A PREROUTING -i $1 -p udp --dport domain -j DNAT --to-destination $ns
Correspondingly the guest machine is configured with a static IP address 172.20.0.2, gateway and DNS server 172.20.0.1. Note that this requires running kvm as root, I have not yet found how to avoid that. Anyway you'd better trust kvm since it plays with your kernel internals... Your comments are welcome.
Appendix
My APT configuration
I configured APT so as to be able to install packages from all official Debian repositories (stable, testing, unstable). I won't explain the philosophy here, but the behaviour I want, when installing a package which might exist in different releases, is the following :
- by default prefer the testing version,
- if for some reason there is no testing version, prefer the stable version,
- as a last resort, use the unstable version.
This is done with the configuration files below (/etc/apt/sources.list, /etc/apt/preferences, /etc/apt/apt.conf). Useful commands : "aptitude update", "aptitude upgrade", "aptitude dist-upgrade" (in case dependencies have changed), "aptitude install [package]", "aptitude remove [package]" (this also removes unneeded dependencies, a nice advantage over apt-get).
However sometimes I want to install a package specifically from unstable, because it contains a feature or a bug fix not yet present in testing. APT handles this very well : "aptitude -t unstable install [package]" (be careful because "aptitude -t unstable upgrade" will attempt to upgrade all your system to unstable !). Other userful commands for managing a mixed testing/unstable distribution : "apt-cache policy [package]", "apt-show-versions".
/etc/apt/sources.list
My /etc/apt/sources.list includes stable/testing/unstable repositories. One therefore should add suitable preferences files, otherwise APT will invariably prefer the most recent packages, i.e. those from unstable. See below.
	# replace ftp.fr.debian.org by your favorite mirror

	# stable
	deb http://ftp.fr.debian.org/debian stable main non-free contrib
	deb-src http://ftp.fr.debian.org/debian stable main non-free contrib
	deb http://security.debian.org stable/updates main non-free contrib

	# testing
	deb http://ftp.fr.debian.org/debian testing main non-free contrib
	deb-src http://ftp.fr.debian.org/debian testing main non-free contrib
	# secure-testing
	deb http://security.debian.org testing/updates main contrib non-free
	deb-src http://security.debian.org testing/updates main contrib non-free

	# unstable
	deb http://ftp.fr.debian.org/debian unstable main non-free contrib
	deb-src http://ftp.fr.debian.org/debian unstable main non-free contrib

	# unofficial packages (I'm testing this repository, in general I'm quite wary about
	# non-official repos but this one seems to be run by real Debian developers)
	deb http://ftp.debian-unofficial.org/debian testing main non-free contrib restricted
/etc/apt/preferences
By default APT should prefer the most recent packages found in the official Debian stable and testing repositories (+ those of the security team).
	Package: *
	Pin: release o=Debian, a=testing
	Pin-Priority: 900

	Package: *
	Pin: release o=secure-testing archive, s=testing
	Pin-Priority: 900

	Package: *
	Pin: release o=Debian, a=stable
	Pin-Priority: 900

	Package: *
	Pin: release o=Debian, l=Debian-Security
	Pin-Priority: 900
/etc/apt/apt.conf
This is required in order to fix a nasty APT bug.
APT::Cache-Limit "20000000";
